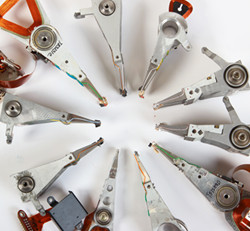
So when you confirm it is physical head damage which requires you to perform the head swap to extract the lost data, the next step is to find a donor head or donor hard drive. What's a donor hard drive for Samsung head swap?
From the old families before Victor, Puma, Verna & etc. ( Max capacity 120Gb, Max Head number 4 ) donor drive for Heads stack has to be chosen by the 4-th symbol on the side sticker which consist from 5 symbols. There are 3 versions of this sticker: xxxAx, xxxRx, xxxSx. 4-th symbol should match on patient and on donor drive, this symbol is responsible for this drive Heads stack manufacturer.
From the families like Palo, Magma, P80M, Delphi and other ( Max capacity 160Gb, Max Head number 4 ) to Poseidon family ( Max capacity 250Gb, Max Head number 4 ), the donor drive could be recognized by other symbols on the top sticker after P/V. There are 2 versions of such sticker: P\V: xS, P\V: xA. As you see the second symbol should be matched. Nowadays this sticker as P/V: xA does not exists on manufactured drives.
There are no symbols/codes responsible for Heads on the HDD stickers for Trident( T133(S)), T166(S), M60(S), M80(S) ) families . But the hard drive manufacturer started to use only "S ( SAE )" heads. So , for this families, the heads stack donor has to belong same family and its heads map should be the same as on patient.
Learn more Samsung data recovery tips here shared by other authors in Data Recovery Salon.
Showing posts with label Samsung Data Recovery. Show all posts
Showing posts with label Samsung Data Recovery. Show all posts
Sunday, January 15, 2012

Samsung Hot Swap Guide
Samsung hot swap is one common and important method to repair samsung damaged hard drives. In order to perform one Samsung head swap, you need to find one donor samsung hard drive with donor PCB. TO be a donor drive, the head map and model number require to be the same.
The following are the reference steps for Samsung hotswap:
Step 1: Power on donor. Run the hdd repair tool which support hotswap. Wait until initialization will complete,then put drive to sleep mode;(You can use pc3000 udma)
Step 2: Unscrew the PCB from donor and install it on patient drive. Screw the screws back. And perform recalibration;
Step 3: Wait until the drive will enter ready state, then read the modules from the drive except some "big capacity" log modules;
Step 4: Power off donor PCB and swap it on donor HDA;
Step 5: Write all necessary modules(Look the list below) from patient to donor drive .Then switch drive's Power off/on;
Step 6: Press Sleep and Swap the PCB from donor drive to patient HDA;
Step 7: Screw all the screws and do the recalibration. The patient drive is "hot-swapped", try to access the data on it.
Modules for those families V11P, VICTOR, PUMA, VICTORPLUS, VERNA, VERNALITE:
"UNITABLE"
"SLISTHDR" (except V11P & VICTOR)
"SLIST"
"TLIST"
"ALIST"
Modules for those families PALO, PANGO, VANGOPLUS, VELOCE, RUBICON, P80A, P80M, DELPHI, POSEIDON, CAESAR:
"06 CONFIG"
"10 SLISTHDR"
"11 SLIST"
"12 TLIST"
"13 ALIST"
"5D CONFIG2" (if it exist in modules table)
"62 ALISTHDR" (except PANGO, VANGOPLUS, VELOCE, RUBICON, P80A)
Modules for those TRIDENT, T166(S), STORM2(S166), TRIDENT3(S250):
"05 SRVTBL"
"06 CONFIG"
"0C ARCOTBL"
"0D GEO_TBL"
"10 SLISTHDR"
"11 SLIST"
"12 TLIST"
"13 ALIST"
"17 SRVTBL2"
"18 ARCOTBL2"
"62 ALISTHDR"
"6E 10SOFS"
"71 VFY_PATT"
"80 SCT_DATA"
"9B HSC_RST"
"9C FOD_NRRO"
"9D FOD_HSC"
"9E HSC_DT"
"9F HSC_RST"
"A0 FOD_NRRO"
"A1 FOD_HSC"
"A2 HSC_DT"
"A3 HSC_CYL"
"A4 IN_SITU"
"A7 FOD_HRLR"
"B3 AVSCAN"
For 2.5 Samsung Mango family
After all modules except "OVERLAY" were copied from patient to donor drive and a hot-swap was done - the drive come to ready state and the access to customer data was achieved.
We were using pc3000 UDMA with this method for Samsung hdd repair with high success rate. Read more data recovery tips or get more information about free data recovery tools and solutions on Data Recovery Salon.
The following are the reference steps for Samsung hotswap:
Step 1: Power on donor. Run the hdd repair tool which support hotswap. Wait until initialization will complete,then put drive to sleep mode;(You can use pc3000 udma)
Step 2: Unscrew the PCB from donor and install it on patient drive. Screw the screws back. And perform recalibration;
Step 3: Wait until the drive will enter ready state, then read the modules from the drive except some "big capacity" log modules;
Step 4: Power off donor PCB and swap it on donor HDA;
Step 5: Write all necessary modules(Look the list below) from patient to donor drive .Then switch drive's Power off/on;
Step 6: Press Sleep and Swap the PCB from donor drive to patient HDA;
Step 7: Screw all the screws and do the recalibration. The patient drive is "hot-swapped", try to access the data on it.
Modules for those families V11P, VICTOR, PUMA, VICTORPLUS, VERNA, VERNALITE:
"UNITABLE"
"SLISTHDR" (except V11P & VICTOR)
"SLIST"
"TLIST"
"ALIST"
Modules for those families PALO, PANGO, VANGOPLUS, VELOCE, RUBICON, P80A, P80M, DELPHI, POSEIDON, CAESAR:
"06 CONFIG"
"10 SLISTHDR"
"11 SLIST"
"12 TLIST"
"13 ALIST"
"5D CONFIG2" (if it exist in modules table)
"62 ALISTHDR" (except PANGO, VANGOPLUS, VELOCE, RUBICON, P80A)
Modules for those TRIDENT, T166(S), STORM2(S166), TRIDENT3(S250):
"05 SRVTBL"
"06 CONFIG"
"0C ARCOTBL"
"0D GEO_TBL"
"10 SLISTHDR"
"11 SLIST"
"12 TLIST"
"13 ALIST"
"17 SRVTBL2"
"18 ARCOTBL2"
"62 ALISTHDR"
"6E 10SOFS"
"71 VFY_PATT"
"80 SCT_DATA"
"9B HSC_RST"
"9C FOD_NRRO"
"9D FOD_HSC"
"9E HSC_DT"
"9F HSC_RST"
"A0 FOD_NRRO"
"A1 FOD_HSC"
"A2 HSC_DT"
"A3 HSC_CYL"
"A4 IN_SITU"
"A7 FOD_HRLR"
"B3 AVSCAN"
For 2.5 Samsung Mango family
After all modules except "OVERLAY" were copied from patient to donor drive and a hot-swap was done - the drive come to ready state and the access to customer data was achieved.
We were using pc3000 UDMA with this method for Samsung hdd repair with high success rate. Read more data recovery tips or get more information about free data recovery tools and solutions on Data Recovery Salon.
Subscribe to:
Posts (Atom)



 Posts
Posts

